Pawan Sharma | March 29, 2011 | | 2 Comments so far

Booting in to RUNLEVEL of your choice


One key skill is to understanding how to boot system in to different runlevels. Everyone, who wants to attempt the Red Hat Certified System Administrator exam, should know how to boot into different runlevels during the boot process. This is explicitly described as an RHCSA requirement. In this section I will explain you how to boot system in to different runlevel for troubleshooting and maintenance. In this section you will use GRUB menu to boot in to different runlevels. 

Here are simple steps which explains HOW TO BOOT IN TO RUNLEVEL OF YOUR CHOICE:

  • When you boot the system BIOS looks for the MBR and finds GRUB to edit the directives in GRUB menu, press any key before the following message expires (normally in 5 seconds):
“Press any key to enter menu”

You will see menu similar to figure given below, from where you can modify how GRUB boots into Linux.
GRUB BOOT menu of RHEL 6

  •  If the menu is password protected, you will have to press p before entering the password.
  •  Then press a to access the kernel command line.
  • At the end of kernel command line, type a space followed by the runlevel of your choice. For example 1 or single, 2,3, and 5.
  •  And press b to boot. You will now boot in to the runlevel you specified in above step.

Reboot your system and you can see that now the system boots in its default runlevel, because editing kernel entries from GRUB menu does not make changes in /etc/inittab file which have an entry for default runlevel. To make your changes permanently you have to edit the /etc/inittab file.

The main purpose for booting system into different runlevel is to correct serious problems in the system. And to correct we use the single-user mode or runlevel 1.

At the GRUB menu you can use following commands:

          Command           Description
  •   b                        Boot the current listed Operating System
  •  d                        Delete the current line
  •  e                         Edit the current line
  • o                         Create empty line underneath the current line
  • O                        Create an empty line above the current line
  •  
These options/commands can be used at boot menu to booting in to different runlevel.
Pawan Sharma | March 28, 2011 | | Be the first to comment!

Runlevels in RHEL 6


          In this post I will explain you about different RUNLEVELS in RHEL 6. All Linux services are organized by runlevels. Runlevels can be used to halt or reboot the system, some runlevels can boot Linux with or without networking services. There are six runlevels and each runlevel executes a specified set of scripts. Runlevel and description of each runlevel is given below:


                Runlevel              Description
  • ·         0                              Halt
  • ·         1                              Single-user mode, for maintenance and repairs
  • ·         2                              Multiuser, with some networking services
  • ·         3                              Multiuser, with networking
  • ·         4                              Unused
  • ·         5                              X11 console, Defaults to a GUI desktop with networking
  • ·         6                              Reboot

          All of these runlevels are defined in /etc/inittab file which is first process and which decides the default runlevel and to launch scripts for a particular runlevel. The functionality of each runlevel is given below:

  • ·         Runlevel 0 will halt the system, never sets this runlevel your default runlevel.
  • ·         Runlevel 1, also known as single-user mode, only one user is allowed to connect to Linux system.    This runlevel is used for system maintenance, repairs, backups and restores.
  • ·         Runlevel 2 is a multiuser with some networking. This runlevel is used for configuring the system  performance.
  • ·         Runlevel 3 is a also multiuser environment with all the networking services. This runlevel or console is used by the system administrator or other general users. This is a text based console
  • ·         Runlevel 4 is Unused. One can edit this runlevel to make it customized to use.
  • ·         Runlevel 5 is a X11 console. This runlevel defaults to a GUI login screen. Logins bring the user to a Graphical User Interface desktop with all networking services.
  • ·         Runlevel 6 will reboot the system. Never set the initdefault (default runlevel) to this value. This will enter a continuous reboot cycle.


          Each runlevel have some series of scripts associated with it. All scripts are collectively stored in /etc/rc.d/init.d directory and all runlevels also have their own directory which contains some start and stop scripts. The scripts associated with each runlevel can be found in /etc/rc.d directory:

          rc0.d
          rc1.d
          rc2.d
          rc3.d
          rc4.d
          rc5.d
          rc6.d

          In someone’s Linux system the default runlevel is 5, init process will in /etc/rc.d/rc5.d and run each “kill” and ”start” script. The kill script is a file or symbolic link to the file with a name that begins with “K”. Likewise, start script is a file or symbolic link to the file with a name that begins with “S”.


Pawan Sharma | March 27, 2011 | | Be the first to comment!

GRUB menu of RHEL 6


         In my previous post I explain the BOOT PROCESS of RHEL 6. In this post I will explain you the GRUB boot loader and files associated with the GRand Unified Boot loader.
         The Standard Boot loader associated with Red Hat Enterprise Linux is GRUB, the GRand Unified Boot Loader. As suggested by the Red Hat exam requirements, for RHCSA exam, you need to know how to use Grub menu to boot in to different runlevels, and diagnose and correct boot failures arising from boot loader errors.

         When you start your computer, your BIOS look for the /boot directory and finds the GRUB menu, which will look similar to figure below:

RHEL 6 GRUB Menu


To understand the GRUB, the best place is to start is form GRUB configuration file.
You can find grub configuration file ‘grub.conf’ in /boot/grub/ folder and also you can find a hard link of ‘grub.conf’ file in /etc/ directory. The contents of a GRUB configuration file in RHEL 6 are given below:

# grub.conf generated by anaconda
#
# Note that you do not have to rerun grub after making changes to this file
# NOTICE:  You have a /boot partition.  This means that
#          all kernel and initrd paths are relative to /boot/, eg.
#          root (hd0,1)
#          kernel /vmlinuz-version ro root=/dev/sdb3
#          initrd /initrd-[generic-]version.img
#boot=/dev/sdb
default=0
timeout=5
splashimage=(hd0,1)/grub/splash.xpm.gz
hiddenmenu
title Red Hat Enterprise Linux (2.6.32-71.el6.i686)
      root (hd0,1)
      kernel /vmlinuz-2.6.32-71.el6.i686 ro root=UUID=0d96a842-0806-42fb-84af-2ae0676fd40d rd_NO_LUKS rd_NO_LVM rd_NO_MD rd_NO_DM LANG=en_US.UTF-8 SYSFONT=latarcyrheb-sun16 KEYBOARDTYPE=pc KEYTABLE=us crashkernel=auto rhgb quiet
      initrd /initramfs-2.6.32-71.el6.i686.img
title Windows 7
      rootnoverify (hd0,0)
      chainloader +1


           Every line which starts with ‘#’ is a comment. The comment lines don’t affect the working of the GRUB file. First line suggests that this file is created by anaconda, which is the RHEL 6 installation program.

The actual commands in this file are:
·         default=0 : this means that GRUB will boot RHEL 5 by default.

·         Timeout=5 : this means, before GRUB automatically boots the default Operating System it will wait for 5 seconds.

·         splashimage : directive locates the graphical GRUB menu screen which is located at (hd0,1)/grub/splash.xpm.gz

·         hiddenmenu: directive means that the GRUB options are hidden, with the message shown below:
Booting Red Hat Enterprise Linux Server (2.6.32-71.el6.i686)

This GRUB configuration file can be used to diagnose and recover GRUB problems.
Pawan Sharma | March 24, 2011 | | 12 Comments so far

Boot Process of RHEL 6

To became a Redhat Certified System Administrator you should have to know about the boot process of RHEL 6. In this post I will explain you the boot process of the latest Redhat Enterprise Linux 6. RHEL uses GRUB (GRand Unified Boot Loader) as its boot loader. The step-by-step boot process is explained below.


  • First we power on the machine, then BIOS (Basic Input Output System) takes over. BIOS is responsible to check RAM, Keyboard, Storage Devices, etc.
  • Once the BIOS has setup the environment it finds the first bootable device (which may be CD-ROM, USB, IDE, SATA Hard Drive, etc.) 
  • After BIOS finds first bootable media it searches for the Master Boot Record (MBR), which contains boot code, this stage is called STAGE 1 GRUB.
  • After Stage 1GRUB, STAGE 1.5 GRUB is consulted, which presents a menu to the user. From that menu we select the OS that we would like to boot. (Grub files are stored in /boot/grub.).
  • After that STAGE 2 GRUB is consulted. Stage 2 GRUB sets up the environment and then calls INIT process. The INIT process is located in /sbin/init. INIT reads a special file /etc/inittab, this is a table file which contains initialization entries like default runlevel and then sets up the appropriate runlevel environment. 
  • All the scripts which are collectively stored in /etc/rc.d/init.d directory and rc.d contains runlevel directories like rc1.d, rc2.d,....rc6.d.
After all these process a runlevel environment is setup and you are able to do tasks on the Redhat EL 6.

Boot Process Summary:

Power On -> BIOS -> Searches for MBR in Bootable Media -> Finds Boot Code (Stage 1 GRUB) -> GRUB Menu (Stage 1.5 GRUB) -> Stage 2 Grub (Setup the environment calling INIT Process) -> Executes scripts of appropriate runlevel and provides the console. 

For any query regarding to GRUB or BOOT Process please comment .....
You can also subscribe for latest news and posts for RHCSA, RHCE, RHEL 6........
Pawan Sharma | March 22, 2011 | 19 Comments so far

RHCSA Tutorials

        Redhat Certified System Administrator is a certification exam which is purely based on the practical knowledge. I personally searched on the web but never find any good tutorial of preparation material, for RHCS, till now. Some websites also offering CBT video tutorial for RHCSA but I think they are too costlier. 

         I have decided to make a tutorial (ebook) for preparation of Red Hat Certified System Administrator. And I have started working on it. In that e-book I will explain all the Objectives which have to be achieved in the RHCSA certification exam. Also give details on how to prepare for the exam.

        It will take a little time for completing the e-book so I will also post the required information on the blog.
You can find all the Objectives explanation in this blog....

If you have any queries or want to know something about RHCSA comment on the posts or email me.
Pawan Sharma | March 20, 2011 | | 2 Comments so far

Post Installation Steps for RHEL 6

In my last post I explain the steps for installation of Redhat Enterprise Linux 6. In this post I will explain the Post installation Steps, which are required to complete your installation. Since this is an important objective for RHCSA, understanding all the installation steps is a must.

After package installation reboot your system and from there you have to follow the post installation steps:
Step 1. After rebooting welcome screen appears,  click forward button for the next step.
http://linux-rhcsa-rhce.blogspot.com


Step 2. In License Information screen click on "yes, I agree to License Agreement" and click forward.

RHCSA


Step 3. Then do the software update process. But to do that you should have a subscription from Red Hat Network(RHN). And click forward to continue.
RHCE


Step 4.  Next screen allows you to create a regular USER. Provide username, full name and password and click forward to continue.
RHEL 6 Post Installation


Step 5. In the Date and Time setup wizard enter the date and time and click forward to continue.
Linux Certification


Step 6. In the next screen you can setup a KDump environment. It is up to you to setup a KDump environment.
http://linux-rhcsa-rhce.blogspot.com


KDump is a Kernel Crash Dumping Mechanism it will prevent you from kernel crash. It is recommended to setup a KDump environment.

After setting-up the KDump environment you are now ready to login to the RHEL 6 server..


If you have any queries email me or comment .......
You can also subscribe for the latest posts so you don't miss any information or news.
Pawan Sharma | March 6, 2011 | | 1 Comment so far

RHEL 6 Installation Steps.


To learn Red Hat Enterprise Linux 6 first of all you have to know about the installation process and how to install the all new Red Hat Enterprise Linux 6. Here I will explain the step-by-step process of installation of RHEL 6.

Installation of RHEL 6 is one of the objectives of RHCSA and RHCE certification from Red Hat. It is directed that one should know at least the graphical based installation of RHEL 6.
First of all you have to obtain the DVD/CDs’ or the RHEL6 DVD.iso.

There are several methods of installing RHEL 6 like: installation from DVD, installation form Hard Drive, Network Installation, Installing via NFS, FTP or HTTP. Steps followed in all the process are same except the media selection from which you will install RHEL 6. I will explain the installation from Local Hard Drive using the Rescue disk (Which can also downloaded from Red Hat website), and the RHEL 6.iso.

Step 1. Extract the folder “images” from the RHEL 6 DVD. Since the image folder contains the product.img file which is used to start the installation and bring up the anaconda to start installation process.


Step 2. Make a folder from where you want to install Red Hat Enterprise Linux 6 and in it paste the “RHEL 6 DVD.iso” file and the “images folder “ which you have extracted in the above step.
I had created the folder in the E: drive of my computer like E:\RHEL6\ and paste the “RHEL 6 DVD.iso” file and the “images folder “ in it. But at the time of installation you have to give the complete path of the “.iso“ image like the hard disk and partition number like “/dev/sdb5/RHEL6/”.
Step 3. Reboot the System and boot form the rescue disk by selecting boot form CD/DVD from the boot menu. After booting form rescue disk you will see the graphical boot menu.
Step 4. There are four options in the menu : 1. Install or upgrade existing systems, 2. Install system with basic video drivers,3. Rescue installed system, 4. Boot from local drive.
Select  the first option “Install or Upgrade Existing System”.


Step5.  Select language and click ok.


Step 6. Select installation method : Local CD/DVD and click ok.
RHCSA Objectives

Step 7. Select partition and determine full path of the folder containing RHEL 6 DVD.iso. In my case the partition is “/dev/sdb5” and the path is “/Operating System/RHEL6/ISO”.

 Step 8. Welcome screen appears click next to continue.

Step 9. Select Installation Language and Keyboard Type.
Step 10. Select type of storage device. If you are confused in between select the Basic Storage Devices.


Step 11. Time Zone Configuration window. Select time and click next to continue.


Step 12. Set Root password and click next.


Step 13. Assign storage device from the box on the left side and send it to the box in right. I have to install RHEL 6 in my 80 Gb sata HDD so I seletct the second HDD and move it to right box (Install Target Devices).

Step 14. In the next step you have to select how you want to use your HDD to install RHEL 6. I prefer to make file systems manually, so I selected create custom layout.


Select the free space in the HDD (and if no free space is there you have to delete some partitions to create free space.) and click on Create. A dialog box open select the Standard Partition and click next.

Red Hat Enterprise Linux 6 Installation
Give the mount point select size and make it primary or extended as per your requirements.
RHCSA Objectives

Make at least three partitions :root (/), boot (/boot) and SWAP.
Take reference from the table given below to make partitions:


Click next to continue.
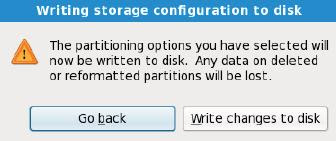
Click on write changes to disk to make changes. Or go back to edit layout.

http://linux-rhcsa-rhce.blogspot.com


Step 15. Install Grub Boot Loader.


I have my PC dual boot Windows 7 and RHEL so I make an entry of my windows 7 OS and select it to boot by default.


Step 16. Installation Server type. Select an option according to your requirements or just select Basic Server and Choose Now to select packages.


Step 17. Wait while packages install.

Step 18.  Installation Complete .remove bootable media form DC/DVD drive and restart your system.

I will publish Post Installation Steps in my next post .
Please comments if you  have any questions regarding any of the above steps……
Pawan Sharma | March 1, 2011 | | 1 Comment so far

RHCSA Objectives

As all knows about Red Hat's certification exams, the new Red Hat System Administrator Exam is also a performance based hands-on exam. The exam objectives are similar to the old RHCT but there are some new task added to the RHCSA.

TASKS to perform in Red Hat System Administrator Exam :

  • Boot, reboot, and shutdown the system normally
  • Diagnose and correct problems at boot
  • Boot systems into different runlevels for troubleshooting and system maintenance
  • Use single-user mode to gain access to a system for which the root password is not known
  • type="text/javascript">
  • Diagnose and correct misconfigured networking settings
  • Diagnose and correct hostname resolution problems
  • Diagnose and address permissions problems and SELinux policy violations
  • Diagnose and correct non-hardware disk storage problems
  • Adding new partitions, logical volumes, filesystems, and swap areas to a system non-destructively
  • Manually open, mount, unmount, and close LUKS-encrypted filesystems
  • Extend existing unencrypted ext4-formatted logical volumes
  • Login or switch user to the root account
  • Use ssh and VNC to access remote systems
  • Locate and read on-line documentation using man, info, and files in /usr/share/doc
  • Locate and analyze system log files
  • Understand how to use grep and regular expressions to analyze text output
  • linux-rhcsa-rhce.blogspot.com
    RHCSA
    Access a bash shell prompt and issue commands with correct syntax; use pipelines and I/O redirection
  • Use text editors such as gedit and vim to create and edit text files
  • Manage system resources: identify CPU/memory intensive processes, adjust process priority with renice, kill processes
  • Manage files and directories: create/delete/copy/move; create hard and soft links
  • Use tar, gzip, and bzip2 to archive and compress files
  • Install Red Hat Enterprise Linux manually with the graphical installer from network installation media
  • Install Red Hat Enterprise Linux automatically using Kickstart
  • Configure a physical machine as a RHEL-based virtualization host
  • Manage virtual machines: install/start/stop/configure to start at boot/access a VM´s graphical console
  • Manage disk partitions: understand MBR-style partitions (primary,extended,logical); list/create/delete partitions
  • Manage logical volumes: create/remove physical volumes, assign PVs to volume groups, create/delete logical volumes
  • Create and configure LUKS-encrypted partitions and logical volumes to prompt for password and mount decrypted filesystem at boot
  • Canage ext4 filesystems: create, label, mount, mount automatically at boot (by UUID or label), unmount
  • Mount and unmount CIFS and NFS network filesystems, manually or by configuring autofs
  • Manage network devices: understand basic IP networking/routing, configure IP addresses/default route statically or dynamically
  • Manage name resolution: set local hostname, configure /etc/hosts, configure to use existing DNS server
  • Manage network services: check status, start, stop, configure to start automatically at boot
  • Configure the scheduling of tasks using cron and at
  • Manage local user and group accounts: create, delete, change passwords, adjust password aging, adjust group memberships
  • Use network user and group accounts stored on an existing LDAP directory service
  • Manage standard permissions: list, interpret, change ugo/rwx
  • Use sgid directories for collaboration
  • Set and manage Access Control Lists (ACLs)
  • Manage SELinux security: set enforcing/permissive modes, list file and process context, restore default file context, use "booleans" to adjust policy
  • Manage default firewall settings with basic tools
  • Install and update software packages from RHN or remote repository, or from the local filesystem
  • Update the kernel package appropriately to ensure a bootable system
  • Modify the system bootloader
  • Configure the system to synchronize system time using remote NTP servers
  • Deploy a VNC server that allows multiple desktops to be shared
  • Deploy file sharing services with HTTP/FTP.